Showing posts with label sugar cookie. Show all posts

Thursday, October 10, 2013

High Heel Fashion Cookies

These cookies are ready for a night on the town! I made a set of purple high-heeled sugar cookies for my friend's mother's birthday.


I didn't have a heel cookie cutter and it was too short-notice to buy one, so I cut the basic shape by hand.


The heel shape got piped onto the cookie and I left the background blank. I wasn't sure how it'd look, but I like the way it came out. Really lets the shoe shine. Next time, I'll be more careful to keep the sparkle on just the icing, not the cookie base!


Everything was covered in luster dust and glitter dust for an extra sparkle and shine.


Simple, but sweet.


This one here was one of my favorites.


Fashionable and fun! I'd totally wear that purple shoe with the teal bow.


All lined up and ready to go out for a walk.


Some of the shoes came out rather funny-shaped, so I think I need to give these another go so I can really perfect them. Perhaps a high heel cookie cutter is in order.


Tuesday, July 31, 2012

Vet Logo Cookies

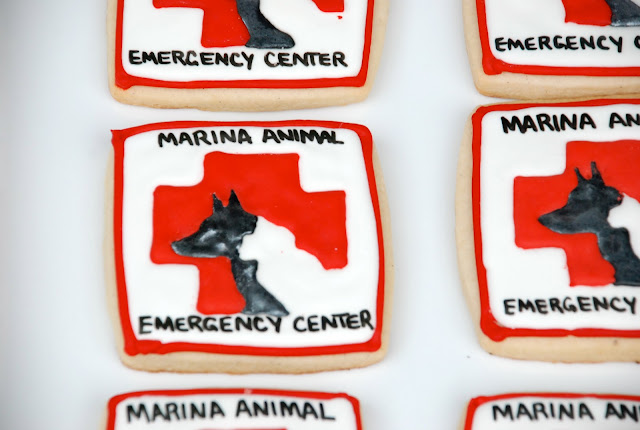
These cookies were made for a new veterinary practice. They wanted a treat to bring to animals hospitals in the area to announce their presence, and I think the message came accross pretty clearly!


I was worried that the red, black, and white colors in the logo would bleed together, so I waited quite a bit of time between piping each layer. 


So that the cookies wouldn't get stale, I started by just piping all 125 cross logos in red onto wax paper. This was great because it let me fix my mistakes, but, most importantly, I had a printout of the logo under the clear wax paper, so I could trace the design. This helped me keep them consistent.


I waited a day before piping the black dogs onto the red crosses. 


 I baked the cookies, outlined them in red royal icing, and let the red dry a day. That same day, I painted the black dogs from the decals in silver luster dust to cover any imperfections and make them even more memorable.


 The next day, I flooded the centers of the cookies in white icing and while it was still wet, I carefully peeled off the decal I mad made and plopped it onto the wet icing, pressing gently.


Once they dried, my mom used an edible marker (basically food coloring in a marker with a felt tip) to write the name of the hospital on each cookie.  Finally, I boxed them up with layers of wax paper and tissue paper. Each dozen cookies got their own little box.


These cookies took days and an incredible amount of work! My kitchen was covered in cookies for days because they're HUGE and took up every available tray, tupperware, and surface. 


 But they're pretty cute, aren't they?


Thursday, February 2, 2012

Sugar Cookie Recipe

I suppose it's time to share my sugar cookie recipe. One of my mother's colleagues e-mailed her the recipe in 1998 and we've been using the same scrap of paper ever since with some slight modifications. This dough is AMAZING. I tried other recipes last year, but this is my only sugar cookie recipe now and I'm never going back. 

See this piece of paper?


It gets pulled out every time I make cookies. Like once a week. I've changed it a bit, but there's only so much you can do to a perfect recipe.

This recipe is incredibly easy. Wanna see how to make it?
 

This is my new mixer. We're pretty tight.


Cream butter and sugar.


After I use a vanilla bean, I toss it in with my sugar because there's nothing wrong with extra vanilla. 


I was making a quadruple batch here, so I used 4 eggs. Crack the egg in a separate bowl and dump it in to the fluffy butter and sugar. Why do you need to crack the egg into a bowl first? Well, maybe it's just me, but the last time I tried to crack an egg directly into the mixing bowl while the beater was running, I accidentally dropped the whole egg in. It was pretty unfortunate.


Once you get the egg in, add the vanilla and a pinch of salt. Beat it a little more for good measure.

Oooh, yummy.

Turn the mixer off. Dump in flour the flour all at once. Yes, I know it's scary, but it'll be okay, I promise. 


Turn the mixer on very low, being careful that it doesn't start suddenly and spew a flour cloud across the room. Not that I've ever done that. 


Once it's combined, stick it in the fridge for a bit until you're ready to use it.


And beware: the dough is irresistible, so don't even bother trying to avoid eating it.


Soft Sugar Cookies

1/2 cup (1 stick)  butter
1 cup sugar
1 egg
2 cups flour
2 tablespoons cream (or milk works fine, too)
Vanilla extract (I usually use about two teaspoons of vanilla bean paste, but the same amount of vanilla extract will work great as well)
Pinch of salt

In the bowl of an electric mixer, cream the butter and sugar on high until light and fluffy. Add the egg and keep beating, then blend in the salt and vanilla.  Dump the flour in all  at once and mix on low until just combined. Refrigerate for a few hours, then roll it out and enjoy! After rolling on a lightly floured surface and cutting your shapes, freeze cookies for at least 15 minutes before baking to preserve crisp edges.  I like my cookies thick so I bake them for about 9 minutes at 375, but  check your cookies at about 6 minutes so you don't over bake them if you made 'em thin. Makes about 2 dozen thick cookies.

Happy baking!


Notes:
*I always make the dough the day before and refrigerate it overnight, but if you're short on time you can stick it in the freezer immediately after you make it for about an hour and it should be ready to roll by the time you've finished cleaning up and getting your royal icing ready.

* If possible, freeze the cut, unbaked cookies for an hour or even overnight for maximum spreadage-prevention, but if you don't have time to freeze and bake them immediately, don't worry about it. They'll spread a tad, but they'll still be very pretty and even more delicious. 

*I leave out the baking powder because I want to preserve the shapes and prevent them from rising.

Sunday, January 8, 2012

Grandpa's Birthday Cookies, or "I Hate the Post Office"

My grandpa is one tough guy. Back in September, he turned 90 and the family threw him a big party. Because I was as school I couldn't make it, but I sent along these cookies instead.

They were eat to make but incredibly impressive and so personal. I ordered edible icing paper with some very special pictures and they were so much fun to use. I made these in my dorm, so supplies. were tricky and they were a huge endeavor, especially because I made 100, but they came out beautifully.


Outline:


 Flood.


Plop the pre-cut frosting transfer on top of the wet icing


Add a border and some pretty dragees. Admire and cross your fingers hoping they'll dry in time. 


Wrap them up very, VERY carefully. 


Pay $60 for overnight shipping so they they'll get there in time for the next day's party. 


And cry when the post office loses them.


True story. 


But at least we got some great pictures. Besides, Grandpa doesn't like sweets anyways.

Sunday, November 13, 2011

Paw Print Cookies

While making the pig and mud cupcakes I showed you a few weeks ago I also made a few cookies for my vet. Dr. Shane takes great care of our dog and rabbits, so I wanted to show her that I appreciate how much love she gives our pets by making her some sweet treats. These pawprints were so easy and came out even cuter than I expected!


Did I mention that she was just about to have a baby but still found time to call and ask how the doggy has been feeling?


I dropped these off at the office in a pretty pink box.


The next day, I got a call from the vet asking for two dozen sesame street cookies for her other daughter's second birthday!


She wanted them the day after the wedding I spent all summer working on.


So, because I'm crazy, of course I said yes. But that's a story (and some pictures) for another day.

Friday, October 14, 2011

Cowboy Hats and Cowboy Boots

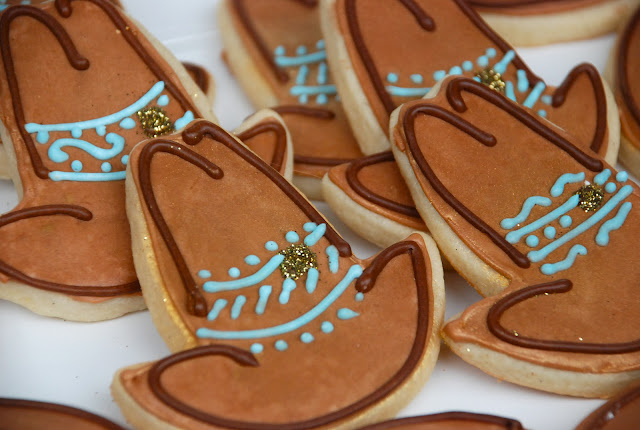
I made cookies. They look like cowboy boots and cowboy hats and have edible glitter and gold luster dust all over them. What more can you possibly want?

Oh yeah. And I made 100 of them.

The cowboy hats were so much fun because I got to make each one a bit different and I love the sparkly gold detailing.

The cowboy boots, however, were quite a bit trickier and took FOREVER. Notice the gold spur and the clunky heel?

But they're cute, so it was all worth it.


Sunday, September 25, 2011

Pig Cookies for Mud Day

I worked at a camp this summer. There was mud day. What is mud day? It's exactly what it sounds like.

To celebrate the occasion I bought a pig cookie cutter, made a mud splash cutter by bending another shape out of place, and made about 100 appropriately themed cookies. I'm gonna let these cuties speak for themselves.


Little piggies. 


 And splashes of mud!


This is what 100 pig cookies look like. They were pretty cute.


 All the pigs packed up and ready to go.


Don't even ask me how many of these I ate...

Blog has moved, searching new blog...